- About Android Version :

Latest Android distribution numbers reveal 13.5% share for Nougat
Google has released Android distribution numbers for the month of August. The latest stats reveal a 13.5% share for the Nougat OS, which is up around 2 percentage points compared to last month.
Specifically, Nougat version 7.0 is now on 12.3% of devices, while version 7.1 is on just 1.2%. With 32.3%, Marshmallow is still the most widely-used Android OS version. That number represents a slight increase of 0.5 percentage points from previous month.
While Lollipop and KitKat also have significant shares, there has been some drop when compared to numbers from July. Jelly Bean now powers 7.6% of all active Android devices out there (a minor drop), while the share of Gingerbread and Ice Cream Sandwich remains the same.
---------------------------------------------------------------------------------------------------------------------------------------------------------
- How To Increase RAM On Your Android Smartphone


Methods to Increase RAM on your Android smartphone
Lack of sufficient space in RAM (Random Access Memory) is one of the several issues faced by many Android users that hamper smartphones by not letting it run applications, heavy games and even performing multitasking efficiently. If your smartphone doesn’t have enough RAM, then it can be a struggle.This article provides to increase ram android phone.
In such a scenario, the importance of additional RAM cannot be overstated. While more storage space gives you more photos, more MP3s, or more video clips, additional RAM helps the processor to work more quickly, thereby helping in the playback (or even creation) of such files.
In this article, we provide you tips will help you to increase RAM on your Android device.
Method 1: Divide Your SD Card To Increase RAM On Android
In order to increase RAM on Android device, given below are the requirements:
- Rooted smartphone Or rooted tablet
- SD card (4 or higher SD Card)
- SD card reader
- Windows PC
Firstly, you need to divide your SD card. To do that, download MiniTool Partition Wizard from here. Install the application on your PC and connect your SD card to your PC with card reader.
Step 1: Open MiniTool Partition Wizard on your PC. Once the wizards opens, click on your SD card and choose Delete option.
Note: This will format your SD card completely. So, please ensure that you perform a complete backup of your SD card before you proceed with the next steps.
Step 2: Once it is successfully formatted, you will have enough space on your SD card as unallocated. Then, right click on SD card and choose “make” option. A popup box will open giving you options for making partition. If SD card is less than 4GB, choose the partition as primary and file system as FAT or if your SD Card is more than 4GB, then choose FAT32.
Step 3: Leave about 512 MB or more space (depending on your choice) for making the next partition. Then choose done and right click on unallocated space of your SD card. Again, click “make” option. Choose primary partition but change the file system to Ext2, Ext3 or Ext4.
Note: (Ext2 is not compulsory as most ROMs work fine with it.)
Note: This will format your SD card completely. So, please ensure that you perform a complete backup of your SD card before you proceed with the next steps.
Note: (Ext2 is not compulsory as most ROMs work fine with it.)
How To Make RAM Of SD Card on Android
Step 1: Click Apply Changes and then the process continues for few minutes. Now, the partition is completed. Install Link2sd from Google Play Store.
Step 2: When you launch the app for the first time, it will require the root permissions and then, it will ask you for the file system of the .ext partition that you had created earlier. Select the option as you had chosen during partition.
Step 3: Classify the apps according to size and start linking them.
Method 2: Using Roehsoft RAM Expander (Swap)
With the help of Roehsoft RAM expander, you can use your SD card as a working memory expansion. This means the more space on your SD card so huge would be your RAM space. Let’s see how we can use it.
Step 1: Download and install Roehsoft Ram Expander (Swap) on your rooted Android device.
Step 2: After installation is done, open the app and grant it a superuser request.
Step 3: Now, you will get to see SDcard memory, Free RAM, Total Free RAM.
Step 4: You need to set the new size for your Swapfile.
Step 5: Just swipe over “Swap/active” and wait for a moment until the swap is executed.
Step 6: Now, choose the path or partition selection for the swap. Simply, select your SD card here.
Step 7: Then, go back to the main page and swipe over “Swap/active” and wait until the app finishes creating the swap file.
It’s done! You will now notice that your Total free RAM has increased. This is the simplest way to expand RAM using the SD card.
Well done, if you have followed the above tutorial from start to finish, then you have increased your Android device’s storage space and RAM. You will find the device is more useful and productive than ever before with more RAM available for processing data.
© Vulture Hack 2017
Well done, if you have followed the above tutorial from start to finish, then you have increased your Android device’s storage space and RAM. You will find the device is more useful and productive than ever before with more RAM available for processing data.
© Vulture Hack 2017
---------------------------------------------------------------------------------------------------------------------------------------------------------
- Secret Hack Codes for Android Mobile Phones:

Hack Android according 2 you.
 |
| Hack Android according 2 you. |
1. Complete Information About Your Phone
*#*#4636#*#*
This code can be used to get some interesting information about your phone and battery. It shows the following 4 menus on the screen:
- Phone information
- Battery information (How to maximize or boost battery life in android phones)
- Battery history
- Usage statistics
2. Factory data reset
*#*#7780#*#*This code can be used for a factory data reset. It’ll remove the following things:
- Google account settings stored in your phone
- System and application data and settings
- Downloaded applications
It will NOT remove:
- Current system software and bundled application
- SD card files e.g. photos, music files, etc.
Note: Once you give this code, you will get a prompt screen asking you to click on the “Reset phone” button, giving you the chance to cancel your operation.
3. Format Android Phone
*2767*3855#Think before you input this code. This code is used for factory formatting. It will remove all files and settings, including the internal memory storage. It will also reinstall the phone firmware.
Note: Once you give this code, there is no way to cancel the operation unless you remove the battery from the phone.
Note: Once you give this code, there is no way to cancel the operation unless you remove the battery from the phone.
4. Phone Camera Update
*#*#34971539#*#*This code is used to get information about phone camera. It shows following 4 menus:
- Update camera firmware in image (Don’t try this option)
- Update camera firmware in SD card
- Get camera firmware version
- Get firmware update countWARNING: NEVER use the first option. Your phone camera will stop working and you will need to take your phone to a service center to reinstall camera firmware.
5. End Call/Power
*#*#7594#*#*This one is my favorite. This code can be used to change the action of the “End Call/Power” button. Be default, if you hold the button down for a long time, it shows a screen asking you to select between silent mode, airplane mode, and power off.
Using this code, you can enable this button to power off without having to select an option, saving you some time.
6. File Copy for Creating Backup
*#*#273283*255*663282*#*#*This code opens a file copy screen where you can backup your media files e.g. images, sound, video and voice memo.
7. Service Mode
*#*#197328640#*#* This code can be used to enter into service mode. In service mode, you can run various tests and change settings.
8. WLAN, GPS and Bluetooth Secret Hack Codes for Android:
*#*#232339#*#* OR *#*#526#*#* OR *#*#528#*#* – WLAN test (Use “Menu” button to start various tests)
*#*#232338#*#* – Shows WiFi MAC address
*#*#1472365#*#* – GPS test
*#*#1575#*#* – Another GPS test
*#*#232331#*#* – Bluetooth test
*#*#232337#*# – Shows Bluetooth device address
*#*#232339#*#* OR *#*#526#*#* OR *#*#528#*#* – WLAN test (Use “Menu” button to start various tests)
*#*#232338#*#* – Shows WiFi MAC address
*#*#1472365#*#* – GPS test
*#*#1575#*#* – Another GPS test
*#*#232331#*#* – Bluetooth test
*#*#232337#*# – Shows Bluetooth device address
9. Codes to get Firmware version information:
*#*#4986*2650468#*#* – PDA, Phone, H/W, RFCallDate
*#*#1234#*#* – PDA and Phone
*#*#1111#*#* – FTA SW Version
*#*#2222#*#* – FTA HW Version
*#*#44336#*#* – PDA, Phone, CSC, Build Time, Changelist number
*#*#4986*2650468#*#* – PDA, Phone, H/W, RFCallDate
*#*#1234#*#* – PDA and Phone
*#*#1111#*#* – FTA SW Version
*#*#2222#*#* – FTA HW Version
*#*#44336#*#* – PDA, Phone, CSC, Build Time, Changelist number
10. Codes to launch various Factory Tests:
*#*#0283#*#* – Packet Loopback
*#*#0*#*#* – LCD test
*#*#0673#*#* OR *#*#0289#*#* – Melody test
*#*#0842#*#* – Device test (Vibration test and BackLight test)
*#*#2663#*#* – Touch screen version
*#*#2664#*#* – Touch screen test
*#*#0588#*#* – Proximity sensor test
*#*#3264#*#* – RAM version
---------------------------------------------------------------------------------------------------------------------------------------------------------
Win Tips & Tricks
In this post you have about to learn How to download paid apps free from Play Store.
Step 1 : Download the both apps Super SU & Get Apk Market.

Samsung Android Phone
Step 2 : Now install the both apps and restart your smartphone.
Step 3 : Then open the Google Play Store and Search Any Paid Apps on Google Play Store.

Samsung Android Phone
Step 4 : Then Click on Share button.

Samsung Android Phone
Step 5 : After clicking on share button you see this type of image then click on Get Apk Market.

Samsung Android Phone
Step 6 : After Click on Get Apk Market you see this image then select the option with zippy share and highlighted by Green color.

Samsung Android Phone
Step 7 : After clicking on zippy share you see the option Get. Then click on it and you find this type of image.

Samsung Android Phone
Step 8 : Click on Get and you found this Download Now Tab. After clicking on Download Now Tab then you get the message Starting download you see in the image.

Samsung Android Phone
Step 9 : You see on Notification Panel your download is complete.

SamsungAndroid Phone
Step 10 : Boom ;) you can install it and enjoy ;)

Samsung Android Phone

Samsung Android Phone

Samsung Android Phone
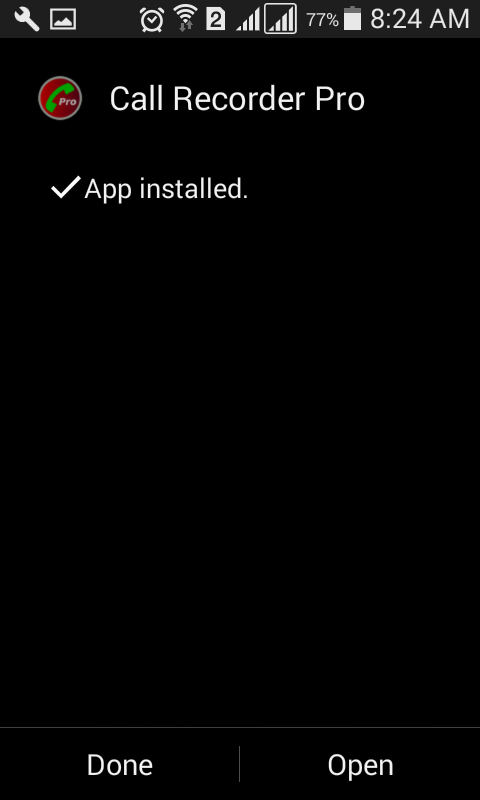
Step 11 : The app is Started Working that call has been Recorded Successfully .

Samsung Android Phone
If you have any concerns or any difficulties on this guide then feel free to place a reply on this thread to get instant help.
------------------------------------------------------------------------------------------------------------------------------------------------------
- How to root your Android with Super SU and TWRP.

If you really want to dig into the Android system, you may find that some apps require root access. Rooting has become less necessary over the years, but it’s still useful if you want to run certain types of apps. Here’s the most widely supported method for rooting your device, and why you might want to.
Warnings
Android devices don’t come rooted for a reason. In fact, some device manufacturers go out of their way to prevent you from rooting. Here’s why:
- Security: Rooting breaks apps out of Android’s normal security sandbox. Apps could abuse root privileges you’ve granted and snoop on other apps, something which isn’t normally possible. In fact, Google prevents you from using Android Pay on rooted devices for this reason.
- Warranty: Some manufacturers assert that rooting voids your device’s warranty. However, rooting will not actually damage your hardware. In many cases, you can “unroot” your device and manufacturers won’t be able to tell if it’s been rooted.
- Bricking: As usual, you do this at your own risk. Rooting should generally be a very safe process, but you’re on your own here. If you mess something up, you can’t just expect free warranty service to fix it. If you’re worried, do a bit of research first and see if other people report success rooting your device with the tool you’re planning on using.
*#*#0283#*#* – Packet Loopback
*#*#0*#*#* – LCD test
*#*#0673#*#* OR *#*#0289#*#* – Melody test
*#*#0842#*#* – Device test (Vibration test and BackLight test)
*#*#2663#*#* – Touch screen version
*#*#2664#*#* – Touch screen test
*#*#0588#*#* – Proximity sensor test
*#*#3264#*#* – RAM version
---------------------------------------------------------------------------------------------------------------------------------------------------------
Win Tips & Tricks
In this post you have about to learn How to download paid apps free from Play Store.
Step 1 : Download the both apps Super SU & Get Apk Market.
 |
| Samsung Android Phone |
Step 2 : Now install the both apps and restart your smartphone.
Step 3 : Then open the Google Play Store and Search Any Paid Apps on Google Play Store.
 |
| Samsung Android Phone |
Step 4 : Then Click on Share button.
 |
| Samsung Android Phone |
Step 5 : After clicking on share button you see this type of image then click on Get Apk Market.
 |
| Samsung Android Phone |
Step 6 : After Click on Get Apk Market you see this image then select the option with zippy share and highlighted by Green color.
 |
| Samsung Android Phone |
Step 7 : After clicking on zippy share you see the option Get. Then click on it and you find this type of image.
 |
| Samsung Android Phone |
Step 8 : Click on Get and you found this Download Now Tab. After clicking on Download Now Tab then you get the message Starting download you see in the image.
 |
| Samsung Android Phone |
Step 9 : You see on Notification Panel your download is complete.
 |
| SamsungAndroid Phone |
Step 10 : Boom ;) you can install it and enjoy ;)
 |
| Samsung Android Phone |
 |
| Samsung Android Phone |
 |
| Samsung Android Phone |
Step 11 : The app is Started Working that call has been Recorded Successfully .
 |
| Samsung Android Phone If you have any concerns or any difficulties on this guide then feel free to place a reply on this thread to get instant help. ------------------------------------------------------------------------------------------------------------------------------------------------------ |
- How to root your Android with Super SU and TWRP.

If you really want to dig into the Android system, you may find that some apps require root access. Rooting has become less necessary over the years, but it’s still useful if you want to run certain types of apps. Here’s the most widely supported method for rooting your device, and why you might want to.
Warnings
Android devices don’t come rooted for a reason. In fact, some device manufacturers go out of their way to prevent you from rooting. Here’s why:
- Security: Rooting breaks apps out of Android’s normal security sandbox. Apps could abuse root privileges you’ve granted and snoop on other apps, something which isn’t normally possible. In fact, Google prevents you from using Android Pay on rooted devices for this reason.
- Warranty: Some manufacturers assert that rooting voids your device’s warranty. However, rooting will not actually damage your hardware. In many cases, you can “unroot” your device and manufacturers won’t be able to tell if it’s been rooted.
- Bricking: As usual, you do this at your own risk. Rooting should generally be a very safe process, but you’re on your own here. If you mess something up, you can’t just expect free warranty service to fix it. If you’re worried, do a bit of research first and see if other people report success rooting your device with the tool you’re planning on using.
How to Flash SuperSU to Your Phone and Gain Root Access
-
Alright, so you’ve unlocked your bootloader, and you’ve installed TWRP. Great! You’re actually almost there. To gain root access, we’re going to use a program called SuperSU, which gives you the ability to grant root access to other apps.
SuperSU is available in the Google Play Store, but that version doesn’t actually give you root access–in fact, you need root access to use it in the first place! Talk about a Catch-22. Thankfully, SuperSU is also available as a .zip file that we can “flash” with TWRP. Doing so will grant you root access along with the management features of SuperSU’s Android app.
So, to start,link is present in end of the article, which will take you to the latest version of SuperSU available for download. Download the .zip file to your computer, plug in your phone with a USB cable, and drag the SuperSU zip to your phone’s internal storage or SD card.
Next, reboot your phone into TWRP recovery. Doing this is a bit different on every phone–for example, you may have to hold the Power and Volume Down buttons simultaneously, then use the volume keys to boot “Recovery Mode”. Google instructions for your specific model to see how it’s done.
Once you’ve done so, you’ll be greeted with the familiar TWRP home screen. Click the Install button.
NOTE: Step 1 : You should probably make a backup in TWRP before continuing with this process.
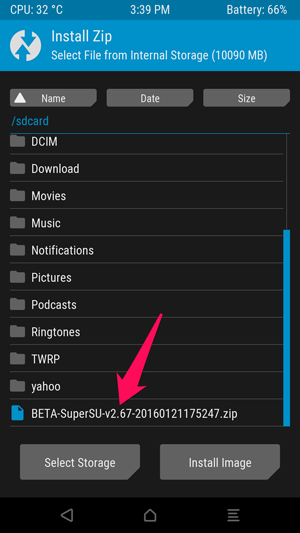
 Step 2 : The following screen will appear. Scroll down and navigate to the SuperSU ZIP file you transferred earlier.
 Step 3 : Tap the SuperSU zip and you’ll see this screen. Swipe to confirm the flash.
 Step 4 : It should only take a moment to flash the SuperSU package. When it finishes, tap the “Wipe cache/Dalvik” button that appears and swipe to confirm.
 Step 5 : When that finishes, tap the “Reboot System” button to boot back into Android.
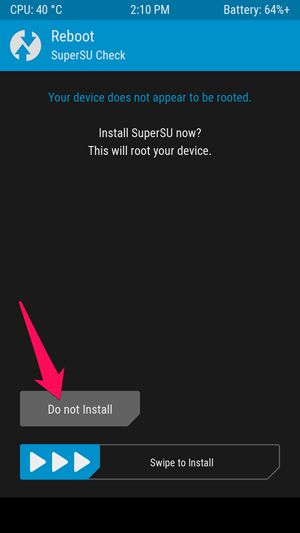
If TWRP asks if you want to install SuperSU now, choose “Do Not Install”. Sometimes, TWRP can’t detect that you already have SuperSU, so it’ll ask to flash its built-in version. But it’s almost always best to flash the latest version of SuperSU yourself, which we’ve just done.
Step 5 : When that finishes, tap the “Reboot System” button to boot back into Android.
If TWRP asks if you want to install SuperSU now, choose “Do Not Install”. Sometimes, TWRP can’t detect that you already have SuperSU, so it’ll ask to flash its built-in version. But it’s almost always best to flash the latest version of SuperSU yourself, which we’ve just done.

- Alright, so you’ve unlocked your bootloader, and you’ve installed TWRP. Great! You’re actually almost there. To gain root access, we’re going to use a program called SuperSU, which gives you the ability to grant root access to other apps.SuperSU is available in the Google Play Store, but that version doesn’t actually give you root access–in fact, you need root access to use it in the first place! Talk about a Catch-22. Thankfully, SuperSU is also available as a .zip file that we can “flash” with TWRP. Doing so will grant you root access along with the management features of SuperSU’s Android app.So, to start,link is present in end of the article, which will take you to the latest version of SuperSU available for download. Download the .zip file to your computer, plug in your phone with a USB cable, and drag the SuperSU zip to your phone’s internal storage or SD card.Next, reboot your phone into TWRP recovery. Doing this is a bit different on every phone–for example, you may have to hold the Power and Volume Down buttons simultaneously, then use the volume keys to boot “Recovery Mode”. Google instructions for your specific model to see how it’s done.Once you’ve done so, you’ll be greeted with the familiar TWRP home screen. Click the Install button.NOTE: Step 1 : You should probably make a backup in TWRP before continuing with this process.Step 2 : The following screen will appear. Scroll down and navigate to the SuperSU ZIP file you transferred earlier.Step 3 : Tap the SuperSU zip and you’ll see this screen. Swipe to confirm the flash.Step 4 : It should only take a moment to flash the SuperSU package. When it finishes, tap the “Wipe cache/Dalvik” button that appears and swipe to confirm.Step 5 : When that finishes, tap the “Reboot System” button to boot back into Android.If TWRP asks if you want to install SuperSU now, choose “Do Not Install”. Sometimes, TWRP can’t detect that you already have SuperSU, so it’ll ask to flash its built-in version. But it’s almost always best to flash the latest version of SuperSU yourself, which we’ve just done.


Managing root permissions with the super su app
When you reboot your phone, you should see the new SuperSU icon in your app drawer. SuperSU controls which other apps on your phone get root permissions. Whenever an app wants to request root permissions, it has to ask your SuperSU app, which will show a request prompt.
To make sure root is working properly, you can download the Root Checker app and verify your rooted status. Alternatively, download a root-only app you’ve been wanting to try, and see if it asks you for superuser permissions.
For example, if we open and try to add an app to Greenify–a handy battery-saving app for rooted phones–we’ll see this popup, asking for root access. If you click Grant and you get a success message, you have successfully achieved root on your phone.
 To manage root permissions, open your app drawer and tap the SuperSU icon. You’ll see a list of apps that have been granted or denied superuser access. You can tap on an app to change its permissions.
- If you have anyh concerns or any difficulties on this guide then feel free to place a reply on this thread to get instant help.
When you reboot your phone, you should see the new SuperSU icon in your app drawer. SuperSU controls which other apps on your phone get root permissions. Whenever an app wants to request root permissions, it has to ask your SuperSU app, which will show a request prompt.
To make sure root is working properly, you can download the Root Checker app and verify your rooted status. Alternatively, download a root-only app you’ve been wanting to try, and see if it asks you for superuser permissions.
For example, if we open and try to add an app to Greenify–a handy battery-saving app for rooted phones–we’ll see this popup, asking for root access. If you click Grant and you get a success message, you have successfully achieved root on your phone.

To manage root permissions, open your app drawer and tap the SuperSU icon. You’ll see a list of apps that have been granted or denied superuser access. You can tap on an app to change its permissions.
- If you have anyh concerns or any difficulties on this guide then feel free to place a reply on this thread to get instant help.


No comments:
Post a Comment